This kaleidoscope quilt block (click to download the pattern) is a 6.5 inch foundation pieced block. You can use our foundation paper to make piecing this block easy. I decided to make a scrappy version. If this is a new skill for you please read our beginners guide to foundation paper piecing before you start.

Firstly, please print our Kaleidoscope Quilt Block pattern, you will need to change the scale on your printer to custom - 100% to print to the correct size. There is a test square you can measure to ensure it has printed correctly. Cut out the 4 squares and then fold alone the lines between the numbers. This will make it easier in later stages.

With your first square flip it over so the print side is facing down. Find a piece of fabric slightly larger than piece 1 (at least 1/4 an inch larger all around). Use a fabric glue stick to put glue over the piece marked as '1' and then place the scrap wrong side down on top of the glue to stick it into place.

Flip it over and fold the fabric back along the line between pieces 1 and 2. Trim off any excess fabric ensuring you leave a quarter an inch seam allowance. I use an add a quarter ruler which makes this easy.

Place your next piece of fabric on top of the first fabric right sides together. Make sure the fabric is big enough to cover piece 2 with an extra 1/4 an inch around the edges. Align the edge of the second piece of fabric with the edge that goes quarter an inch over the line between 1 and 2.

Take this over to your sewing machine, flip the paper being careful to hold the fabrics in place, so the fabrics are facing down. Stitch along the line between number 1 and 2 using a small stitch (I use a stitch length of 1.3 for foundation piecing). Fold the fabric back to cover piece number 2 and press into place.

Repeat this process for the lines between 1 and 3, and between 1 and 4. Then do the same for the 4 other squares. Trim off any excess fabric around the edge, you don't need to leave a quarter an inch seam allowance this time as we've already added it to the paper for you.

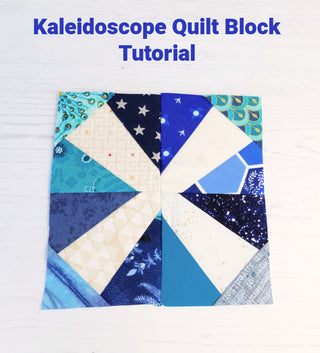
Lay your squares out next to each other to decide what order you wish them to be in your finished block.

Pick 2 which are next to each other and sew them together along the seam allowance line. Press the seams open. Repeat for the other 2.

Place both sets of 1 squares on top of each other and sew along the seam allowance line again pressing the seams open. I used our quilting clips to hold the layers together whilst I sewed.

Tear the foundation paper out from the back and give your finished block a final press.

Why not make the economy block included in our introduction to foundation paper piecing article next or our pineapple block? Or we have 10 free 6.5 inch quilt blocks included in our Quilter’s Workbook with a free sampler cushion project on our blog.