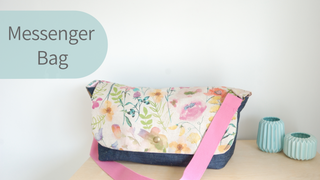
This stylish medium size messenger bag is handy for day to day use. It has an internal pocket and a snap fastener so the flap doesn’t blow open. It is beginner friendly, simply follow the simple step by step instructions below. The flap is ideal for show casing your favourite fabric, and we used denim to make the body of the bag more durable.
You will need
- 1/2 metre exterior fabric
- 1/2 metre interior fabric
- A fat quarter of fabric for the flap
- 1/2 metre of fusible fleece – we used Vlieseline H640, or heavy weight interfacing
- 1 x magnetic snap or popper
- 2 x rectangle rings
- 1.5m of bag strap webbing
- Useful to have: sewing clips
Cutting Instructions
- 2 x pieces 18 x 11 inches from exterior fabric, lining fabric and fusible fleece
- 1 x 14 x 7 inches lining fabric for the pocket (optional)
- 1 x 15 x 10 inches from the flap fabric, lining fabric and fusible fleece
- 2 x 3.5 x 4 inches from exterior fabric for strap tabs
Tip – cut the fusible fleece pieces marginally smaller than the fabric ones so you don’t accidentally get any glue on your iron.
Notes
- Finished size: 10.5 inches high, 13.5 inches long and 3.5 inches deep
- Seam allowance: 1/4 an inch
First Steps
- Press your fabrics and fuse the fusible fleece to the back of your exterior fabrics
- Fold the the strap tabs in half so the 4 inch sides align and the fabric is right sides together. Press.
- Press the (optional) pocket piece in half right sides together to make a 7 inch square
Assembly
- [Pocket – optional] Make the pocket by sewing around the edge leaving a gap to turn it through. Clip the corners to reduce bulk and turn through the gap and press.
- [Pocket – optional] Fold one lining piece in half, do the same with the pocket. Use these lines to line the pocket up with the middle of the lining, placing it 1.5 inches up from the bottom. Make sure the turning gap is on one of the edges which will be sewn (ie. Not the top of the pocket). Sew down the side, across the bottom and up the other side of the pocket to secure it to the lining.
- Place the two main lining pieces right sides together, sew the sides and base together leaving a 5 inch gap in the bottom for turning through.
- Draw 2 inch squares in both bottom corners and cut along the chalk lines. Pull the corners to align the seams and sew across to box the corners as per the photo above right.
- Repeat the two steps above for the exterior fabric but do not leave a gap in the bottom. Turn the exterior right sides out, but leave the lining inside out.
- Sew the strip for the tabs along the longer sides with the fabric right sides together, then turn them through. Slide a rectangle ring onto each tab, fold in half and pin to the side seam of the bag. Secure in place with 2 or 3 rows of stitching.
- Pick up your bag flap pieces and round the two bottom corners, I used a small plate.
- Fold the flap lining fabric in half vertically to find the centre, make a mark 2 inches up from the bottom (curved corners end) of the flap. This is where you will insert your snap. Make a mark where the 2 sides of the snap will be, make small cuts there. Place an offcut of fusible fleece or wadding behind and insert the snap and fix the back to it. The above right photo shows the back of the snap.
- Place the flap pieces right sides together, sew all around the edge but leaving a 5 inch turning gap on the long straight edge. Turn it through and press. Top stitching around the edge of the flap 1/8 of an inch from the edge closing the gap as you sew.
- On one side of the bag body draw a chalk line horizontally 1.5 inches down from the top edge. Pin the straight edge of the flap to this line and sew it into place. You can sew along your top stitching if you’d like it to look neat.
- Fold the flap over the top of the bag, mark where the metal snap touches the exterior fabric. Insert the other side of your magnetic snap here, there’s already fusible fleece attached to your exterior fabric so you don’t need to add any more behind the snap.
- Fold the flap back against the back of the bag (right sides together). Place the bag exterior inside the bag lining, with the right sides together (your lining fabric should still be inside out). Line up the top edges and pin/clip them into place. Make sure the strap tabs are between the lining and exterior fabric.
- Sew right around the top, then turn it through the gap you left in the lining. Press it, then stitch the gap closed by machine or hand.
- Decide how long you want your strap to be, I did this by draping it on me. Cut to size. I made mine 62 inches long as I’m quite tall. You could of course add a slider at this point to make your strap adjustable.
- Thread the strap into one of the rectangle rings on the side of the bag, fold it back on itself. Tuck the raw edge under 1/4-1/2 and inch and then stitch into place. I do 2 rows of stitches just to make sure it’ll hold even if the bag is fully loaded with heavy things. Repeat for the other end of the strap.